How to Preview your Website by editing your Hosts file
Editing your hosts file enables you to override the domain name system (DNS) for a domain on a specific server. This process is useful in the following situations:
A company migrates your site, and asks you to take a look at their work before making the site live.
Your site is still live on the original server, so how do you view it on the new one?
Companies like GoDaddy migrates sites in this manner. Now comes the part where you need to check the migrated site, before changing where your domain points. Luckily, there is an easy way to do just that.
Editing your hosts file causes your local machine to skip the DNS process entirely, and look directly at the Internet Protocol (IP) address that you specify.
Modifying the hosts file involves adding two entries to it. Each entry contains the IP address to which you want the site to go to and a the internet address.
For example, add the following two entries to your hosts file, directly after the IP address: www.domain.com and domain.com. Change out ‘domain’ with the real name of your site.
For instance, you might see the below entry, in our hosts file.
64.49.219.194 www.digitallythrive.com
64.49.219.194 digitallythrive.com
So how do I edit my hosts file?
This article provides instructions for locating and editing the hosts file on the following operating systems
Microsoft® Windows® 10, Windows 8, Windows 7, and Windows Vista™
Microsoft Windows NT™, Windows 2000, and Windows XP
Edit your hosts file in Windows
If you are using a Microsoft operating system like Windows 10, Windows 8, Windows 7, and Windows Vista you must run Microsoft Notepad as an administrator.
Windows 10 and Windows 8
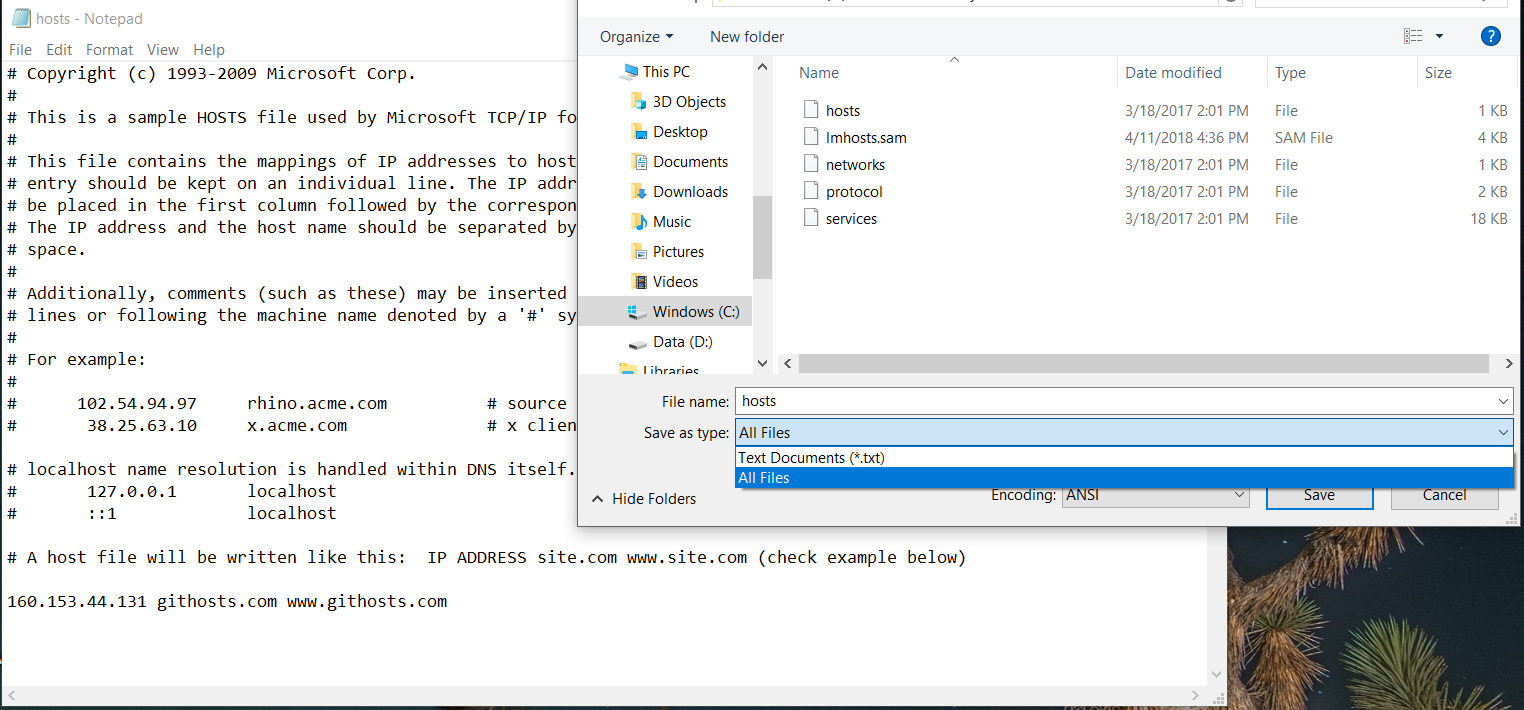
Watch for steps marked with*IMPORTANT – which are flagged as the most common mistakes made. DigitallyThrive found several areas that were either incorrectly documented, or extremely vague. These steps, if incorrectly done, will cause the entire process to fail. Due to the confusion, along with the current shoddy documentation of this on the internet, we have included screenshots for all of you.
1) Press the Windows key, or click the bottom left Windows icon.
2) Type Notepad in the search field.
3) In the search results, right-click Notepad and select Run as administrator.
4) From Notepad, open the following file: C:\\ > Windows > System 32 > drivers > etc (this directory appears empty at first)
5) To the right of filename, change "Text Documents (*.txt)" to "ALL FILES"
6) Make the necessary changes to the hosts file. On a new line type in: IP domain www.domain.com with spaces between each. (Replace IP with an actual ip address of the server, domain with your actual website name, one without www, and one with).
7) Select File > Save as. Again - Make sure All Files is selected at bottom right, where it reads "Save as type:"